Biobiogo Help
Account Questions
How do I cancel my subscriptions?
If you are a Shopify app user, please launch the app from your Shopify admin panel, then go to the following URL:
👉 https://biobiogo.com/billing/cancel-app-subscriptions
If you are not a Shopify app user, please contact us via the General Email Channel in the following page:
👉 https://biobiogo.com/contactbiobiogo
Keyword: cancel subscriptions, cancel plans, change plans
General Questions
What is Biobiogo and how does it work?
Biobiogo is the best & free link in bio tool. It allows you to accept donations, start a membership, sell anything you like. With Biobiogo all these things are easier than you think.
Biobiogo also offers the simplest free chatbot solutions to help creators and business to grow their audience and generate a better result.
Do I need to pay to use Biobiogo?
Not at all. Biobiogo is absolutely FREE.
How to change my URL, username, display name and bio information?
To change your basic information is very simple.
To do so, login to your Biobiogo account, click Setting on the top menu bar, then you will be able to change your information accordingly.
Tips: The last part of your link URL is your username.
Can I custom my Biobiogo page SEO metadata?
Yes. To do so, click here 👇
https://biobiogo.com/my/settings#position-seo-setting
Or login to your Biobiogo account, click Settings on the top menu bar, scroll to the SEO Metadata section.
How can I track my page traffic?
We currently support Google Analytics and Facebook Pixel tracking code, to setup, click here 👇
https://biobiogo.com/my/settings#position-tracking-integration
Or login to your Biobiogo account, click Settings, scroll to the Tracking Integration.
How to connect my Biobiogo to my Messenger/Instagram DM?
You can connect your Biobiogo to the
1. The Messenger of your Facebook Pages
2. and Creator/Business Instagram accounts.
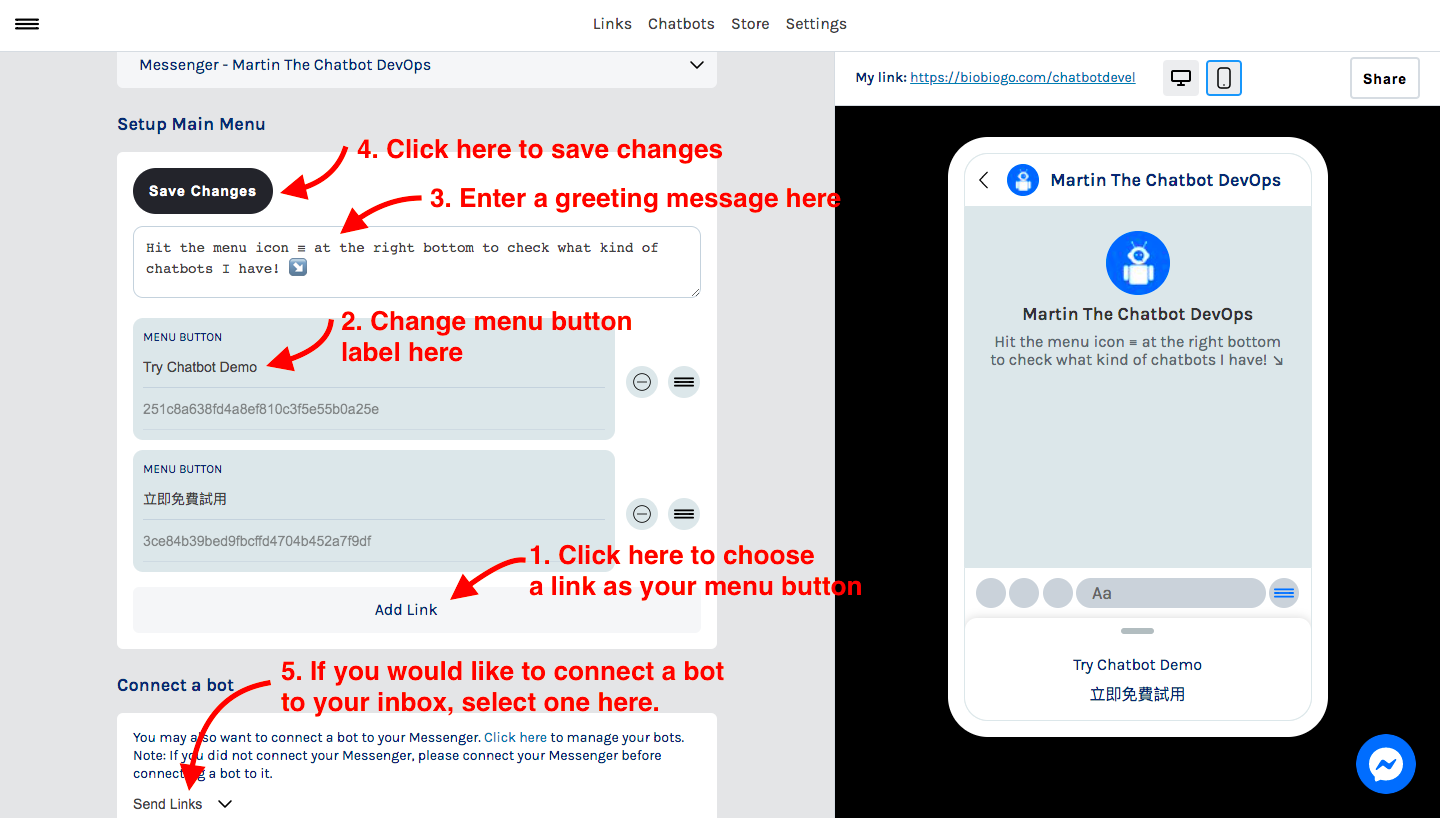
To do so, click "Settings" in the top menu bar, click "Connect to messaging apps", more specifically, check the graph.
To know how to turn your Instagram account as a creator/business account, check here https://biobiogo.com/resources/how-to-connect-biobiogo-to-your-instagram-messaging
What are the benefits connecting my Biobiogo to messaging apps?
You can connect your Biobiogo to Messenger, Instagram DM and Twitter DM.
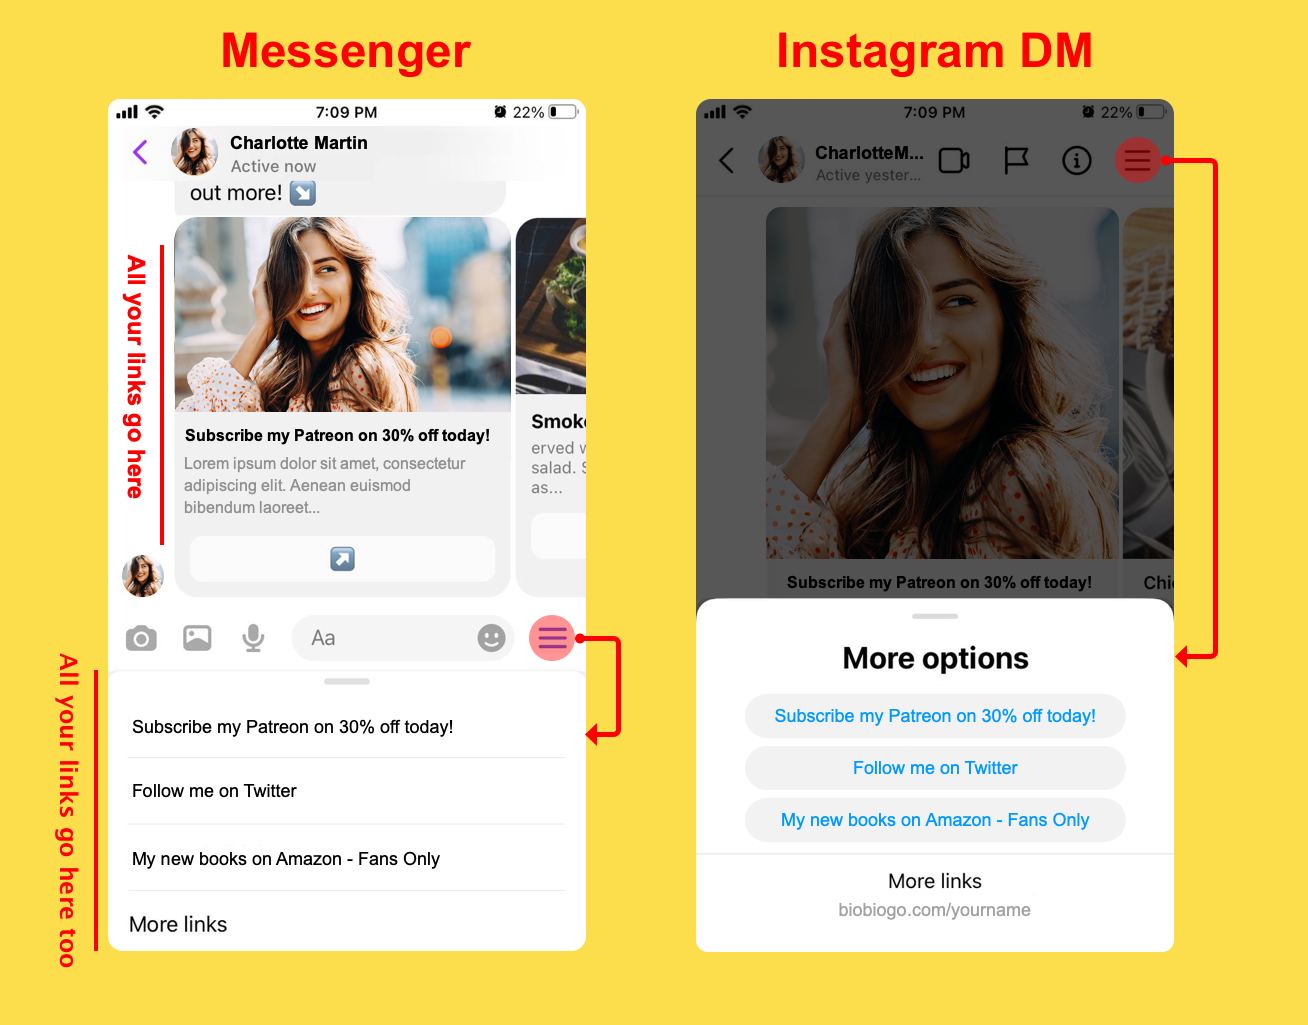
After connecting your Biobiogo to Messenger or Instagram DM, anyone that has not sent you messages in the last 24 hours, sends you a message, your Messenger or Instagram DM will reply your links automatically.
Additionally, you can set a persistent menu to your Messenger and Instagram Inbox which allows your follower retrieve your links at anytime in your inbox.
For Twitter, you can add a welcome message to your inbox and your links will be attached to the message. Anyone that never chats with you or hasn't chat with you in the last 48 hours, opens your DM inbox will see your welcome message and your links.
Click the graph to see how your inbox exactly like of connecting your Biobiogo to it.
Keywords: Connecting apps, connect instagram, connect messenger, connect twitter
How do I add an FAQ block to my Biobiogo?
You may want to add FAQ blocks to help your audience understand your products and service better.
Adding an FAQ block is just as simple as adding a regular link to your Biobiogo. Here is how we can do it.
1. Login to your Biobiogo account
2. Click Links on the top menu bar
3. Click Add Link button
4. Choose Question & Answer
5. Fill in the question and answer in the editor.
6. If you would like to use an image/graph to explain the question, you may click on the Image Icon (witch is at the right side of the Save button) to upload one.
To watch a video click here 👇
https://biobiogo.com/resources/how-to-add-faqs-to-my-biobiogo
How do I add a Product block to my Biobiogo?
You can add or update information about a product such as its name, description, image, price and other configuration in your Links dashboard. Here how we will do it.
Sign in to your Biobiogo account, if you don’t have one, create one, it is completely free.
1. Click Links on the top menu bar to go to your link dashboard.
2. Click Add Link, choose Physical\Digital Product.
3. Enter a title, optionally a description.
4. Click on the Image icon to upload a nice image.
5. Click on the $ icon to setup a price, which you may charge a single/recurring payment.
Chatbot Questions
How do I create a bot?
Login to your Biobiogo account, click "Chat bots" on the top menu bar, then choose a bot type to create.
After finishing your bot flow, find the connect button at the right side of the screen, then choose a messaging app to connect your bot to.
Is't FREE to create my own bots?
Absolutely. Offering free service that is what we do.
What apps I can connect my bots to?
Currently:
We currently support Messenger and Instagram chatbots.
Adding:
We are adding WhatsApp and Telegram to our support list.
How do I sell my products & service with the chatbot?
We offer the best eCommerce chatbot to everyone to see their physical and digital products.
How to do it?
1. Add products to your Biobiogo.
2. Connect a payment provider.
3. Add the product to chatbot.
More details:
👉 https://biobiogo.com/
Payment providers we support:
Stripe, PayPal and Coinbase.
How to apply a discount for my followers?
You can setup discount for everyone or for Instagram followers only while you are adding the "Create Checkout" component to the bot.
Can I create a bot exactly like this helping bot?
Absolutely. Here is how you can do it.
Add your FAQs:
Go to your Link dashboard, click Add Link, choose Question & Answer.
Add to the bot:
Use the "List FAQs" component in the bot editor.
What is a bot scope?
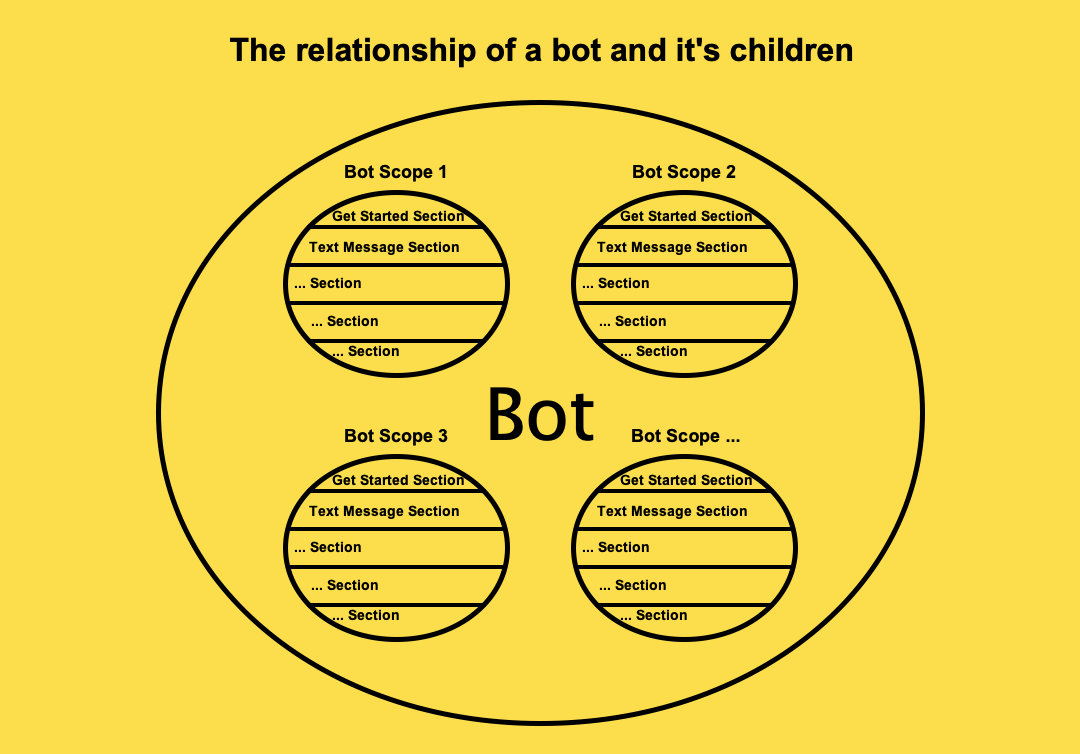
A bot scope is an isolated running environment of a bot.
When a customer entered a specific scope, all messages sent by this customer will be handled within the scope.
You can use "Jump to Scope" component to move the customer between scopes.
Each bot can maximumly have 64 scopes.
Please click on the above graph get a better understanding.
What is a message section?
Each bot scope has at least 5 message sections.
👉 Get Started Section
👉 Text Message Section
👉 Quick Reply Section
👉 Live Agent Request Section
Some accounts may also have "Message Reaction", "Story Reply", "Store Mention" and "Comments" sections.
Each message section handles its own kind of messages. For example, the Text Message Section handles all incoming text messages, you may setup your response rules for incoming text messages in this section.
How to jump between sections?
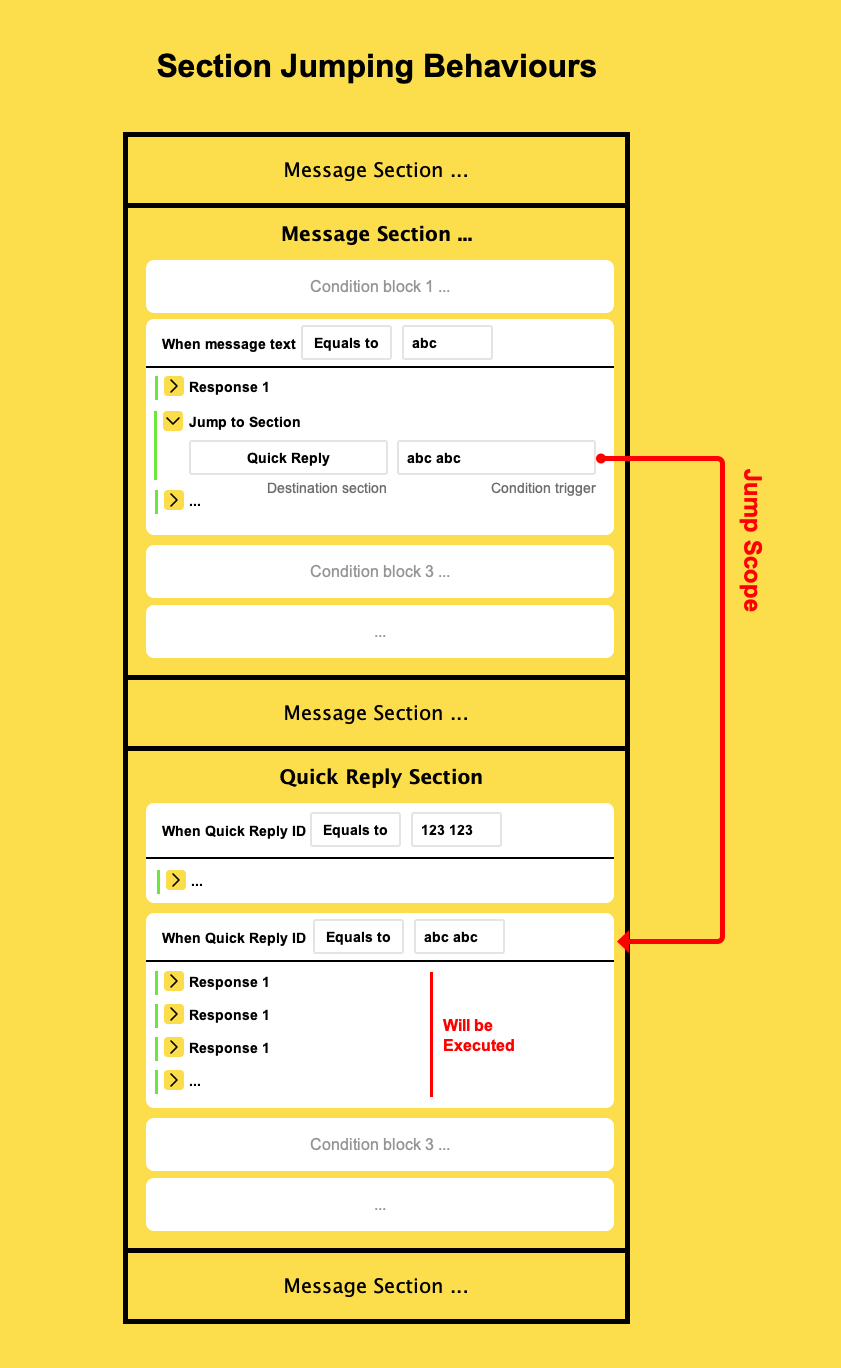
You may use "Jump to Section" component to jump between sections in a bot scope.
What is a "Condition trigger" while jumping to another section?
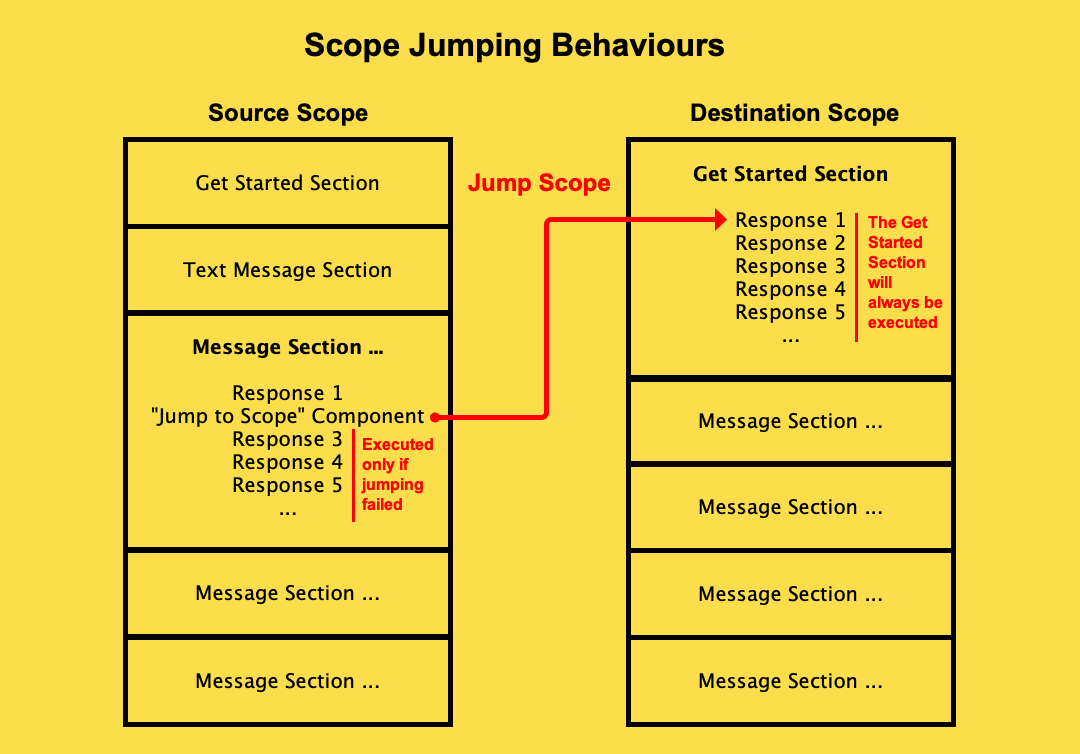
A condition trigger is more like a position. For example, you are jumping to Quick Reply Section with condition trigger "add_to_cart".
Then the Condition block under Quick Reply Section where "When Quick Reply ID Equals to add_to_cart" will be executed.
Please click the graph to get more specified information.
Keywords: Jump section, section jumping, message
What is a "Condition trigger" when jumping to another message section?
A condition trigger is more like a position.
For example:
You are jumping to Quick Reply Section with condition trigger "add_to_cart".
Result:
The Condition block under Quick Reply Section where "When Quick Reply ID Equals to add_to_cart" will be executed (of course only you have this condition block).
Please click the graph to get more specified information.
Keywords: Jump section, section jumping, message section
How do I retrieve customer information?
Below variables are used to retrieve the customer information.
$sender.name
Get customer's name
$sender.address
Get the customer's address
Only after involving "Ask For Address" component.
$sender.email
Get customer's email
Only after involving "Create Checkout" component.
$sender.phone_number
Get customer's phone number.
Only after involving "Create Checkout" component and phone number is required.
ℹ️
Note that the FAQ components such as "List FAQs" and "Search FAQs" may not applied variables to the question and answer content.
Keywords: customer name, customer email, customer address, custom phone number
How to set and retrieve variables in the bot flow?
You are able to set variables and retrieve later on. To do so add Set Variable component to your bot flow with a pair of key/value.
You can retrieve a variable in other components by reading
$variables.some_key.
Can I send a notification when the customer trigger a certain action?
Yes.
Please use Send Notification component in your bot flow.
