Do you know that you can simply put your media files like photos and videos to your Dropbox folder and these files can be post to your social accounts like Facebook, Instagram, Twitter and Pinterests?
With Biobiogo Auto Post you can enable this feature within minutes. Here is how you can do it.
1. Connect your Dropbox and social accounts
To connect your Dropbox and social accounts, login your account and go to https://biobiogo.com/my/social-connect/overview or click Settings on the top menu bar on your account.
2. Create your Auto Post campaigns
To create an auto post campaign is very easy. Click Automation, then click Auto Post on the top menu bar, then you will be able to create your campaigns.
During the campaign creation, choose your Dropbox account as the data source, and you will also required to choose a social account as the destination where your media files will be posted to.
After choosing your data source and the post destination, you will be redirected to the campaign editor where you will edit the campaign details.
While editing your campaign details, you will be required to enter the Dropbox folder name where your media files are stored. Please note that the folder path prefix /Dropbox/Apps/biobiogo/ is fixed. For example your enter a name My Photos, the full path will be /Dropbox/Apps/biobiogo/My Photos. Files put into this path will be posted to the destination automatically from day by day.
3. Organize your files in the Dropbox folder
Please note files in the Dropbox folder will also need to be well organized. As detailed below.
Accepted file formats: JPG, JPEG, PNG, GIF & MP4
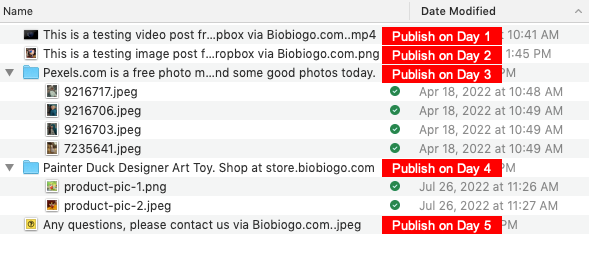
A single photo/video post: you will need to put the file to the target path directly for example /Dropbox/Apps/biobiogo/My Photos. The file name will be the post caption.
Carousel post: you will need to put the carousel photo into a subfolder, for example /Dropbox/Apps/biobiogo/My Photos/These are my todays work. The subfolder name will be the post caption.
Please refer to below screenshot.
